How to Calibrate Your Monitor
Color calibration should definitely be an essential part of every graphical users workflow. Otherwise, it is impossible to tell whether the colors that are displayed by your monitor are truly accurate and whether what you see will match the print. There are many ways to do it and the process can be fairly simple or very complex, depending on how accurate you want to reproduce the colors and whether you are also printing your work in-house. The simple method involves free and commercial tools for color profiling LCD / CRT monitors for everyday photo editing and image viewing, and there is also an end-to-end professional-grade color profiling that requires very concise calibration of all display and output devices (such as printers). In this article on how to calibrate your monitor, I will only focus on simple methods to make your monitor show more or less accurate colors, so that you could rely on it for everyday graphics needs.
How to Calibrate Your Monitor
1) Why is calibration important?
One of the big misunderstandings about calibration, is that people think that it is only needed for printing. Wrong! It is needed for everything – from viewing other people’s work online to processing your own images in Adobe Photoshop or Lightroom. If your monitor is not properly calibrated, you are most likely not seeing everything in the image. For example, a smooth and beautiful sunset might appear as pale and gradient streaks of light or a black and white picture might appear too dark or too light.
I personally did not pay much attention to color calibration for a long time, until I started hearing complaints from other photographers that I over-saturate my pictures. One day, I saved some of my best work on a thumb drive and took it to a friend who had a color profiled professional-grade monitor for photography. When we opened my photographs, they clearly appeared way over-saturated. At first, I thought that something was wrong with the way I extracted the images from my PC. But upon closer examination, I found out that there was nothing wrong with the color profile of the image, but rather really bad post-processing as a result of zero monitor calibration. I was shocked seeing my images look dull and too colorful. I remember that day very well, when I got back home and spent the next several days reading about color reproduction, monitors and other information on the Internet. It took me several weeks of reading and studying to fully understand how software/hardware, color management, PC monitors, post-processing and other things work together when it comes to colors. Once I had my setup calibrated, I had to go back and work on many of my older images. And since I always shoot in RAW, I was able to re-process most of my photographs.
2) What kind of monitor do you have?
Your monitor is one of the most important parts of color reproduction. If you purchased an LCD screen for under $300 dollars, you most likely have a “TN” or “Twisted Nematic” panel that cannot accurately display colors due to dithering, has a very limited color gamut and might not have a good viewing angle. I highly recommend reading my “best monitor for photography” article to identify the type of monitor you are using for viewing and editing photographs. It is important to know this, because effective color calibration depends on constant color accuracy of your monitor and if you have a cheap display, the colors (especially black and white tones) will shift from time to time and you will have to recalibrate your monitor very often. Therefore, if you have one of those cheap monitors and do not want to be plagued with inaccurate colors and tones, I highly recommend replacing it with a better monitor.
3) Visual vs Hardware Calibration
As I have pointed out above, you can calibrate your monitor for free or through commercial hardware. Let me quickly tell you the difference between free software / online tools versus using hardware calibration. In order to accurately profile a monitor, the colors that the screen outputs need to be analyzed and compared with real colors. When you use just software or free online tools, you cannot really compare the colors of your screen with real colors, unless you have a professional color chart such as X-Rite ColorChecker. You cannot just print out a color chart on a printer – the colors need to come from a professionally profiled printer. But even if you have a professional color chart, it would be difficult to try to match the colors, because you are still heavily relying on your vision and perception of colors.
Compared to visual calibration, hardware calibration works by analyzing the colors by an external device that does color and gamma comparisons, then automatically applies necessary changes to colors and gamma via proprietary software. Therefore, there is always going to be a difference in accuracy between the two. In addition, the hardware calibration process consumes significantly less time and can be performed on a periodic basis without much hassle.
How to Calibrate Your Monitor
4) Free Tools
Before you do anything, start out by resetting your monitor settings to factory defaults. The reason why you want to do this, is because you do not want to start calibrating a monitor that has too much or insufficient brightness levels and various levels of gamma. On some monitors you can revert to factory defaults through a menu setting, while on others you can press a combination of buttons to revert to factory settings. If you cannot find a way to do it on the monitor, check out the monitor manual or use Google to find out how you can reset to factory defaults.
Next, perform the following:
- Make sure that your monitor is in an area where sunlight or other light sources do not reach it.
- Leave the monitor on for at least 10-15 minutes to let it heat up.
- Make sure that the screen resolution is at its optimal setting. If you have an LCD monitor, push the screen resolution to the highest allowed number, also known as “native resolution”.
- Make sure that your video card is outputting in 24-bit mode (16 million colors).
- If the monitor has both DVI (digital) and VGA (analog) connectors, connect with a DVI cable instead.
- Uninstall all existing color-calibration tools and software.
Now you are ready for visual calibration through free software.
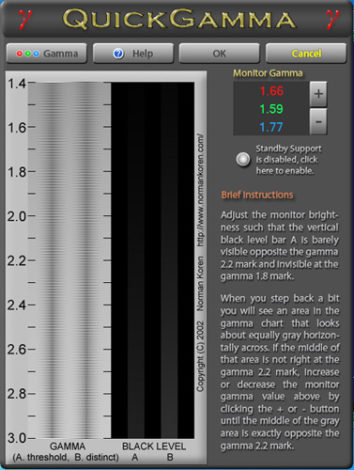
The best free software tool that I found on the Internet and tried out was “QuickGamma“. It lets you visually calibrate your screen by increasing or decreasing the gamma. You can do it for black/whites only, as well as for colors, but the author warns not to mess with colors, because it is difficult to correctly adjust them.
How to Calibrate Your Monitor in Windows 7
I highly recommend reading the instructions and software help that opens up as soon as you fire up the application for the first time. It is important to follow everything exactly as it says or you might end up with a badly calibrated monitor. Once you make the changes and hit “OK”, the program will save your adjustments and reload them every time you reboot.
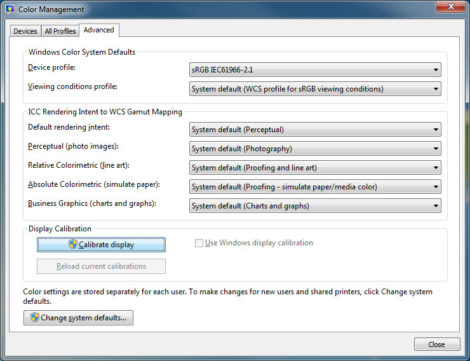
If you have Windows 7, you might want to try out its own Color Management tool. Simply go to Control Panel and double click on the “Color Management” icon and a new window will open up. Go to the “Advanced” tab and click the “Calibrate display” button under “Display Calibration”:
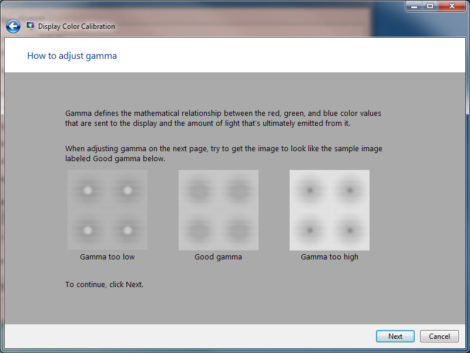
It will fire up a “Display Color Calibration” wizard with clear instructions on the process. It even provides some nice suggestions on how the image should look when properly calibrated:
 Just follow the wizard all the way to the end and the software will automatically create a new color profile for you after the calibration process is complete.


